WordPress shows the same sidebar on all posts and pages of your website. Sometimes, you may want to display different sidebar on a category, a particular post, or some promotional pages.
In any of these cases, you have to use a plugin like Custom Sidebars. This excellent free plugin enables you to create and display an unlimited number of custom sidebars.
Let’s get started and find out how to display different sidebars for different pages in WordPress.
Creating a New Sidebar
First of all, install and activate the plugin on your website. Then, go to the Appearance > Widgets page. You will notice a new section titled “Sidebars.”

Click the “Create a new sidebar” button. In the resulting pop-up, provide a name and a description for the sidebar. It is also possible to add custom text or code before or after the title and the sidebar. To do that, check the “Advanced” box to open those options.
Once you have made the necessary changes, click the “Create Sidebar” button. With that, you have created your first custom sidebar. You can repeat the process to create as many sidebars as you want.
Next, you have to add widgets to your new sidebar. The process is exactly the same as adding widgets to the regular sidebar. You just drag and drop the desired widget into the sidebar.
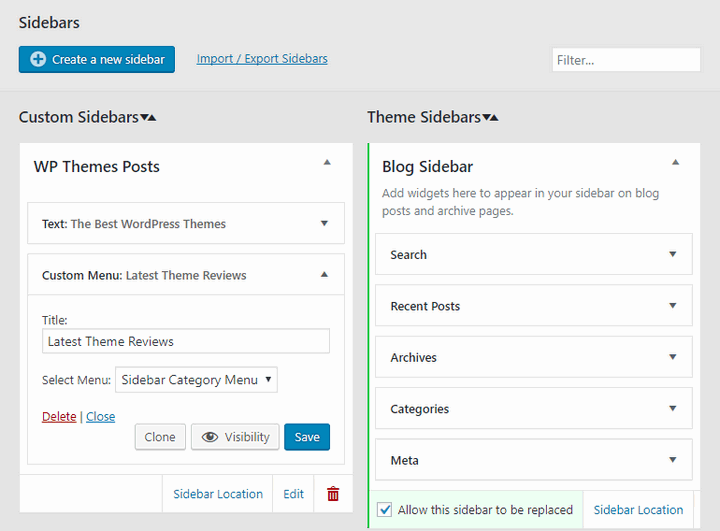
You will find all the usual widget options and change the widget position as well. The “Clone” button allows you to make a duplicate of a widget and use it on other sidebars.
Deciding Where to Display the Sidebar
The next step is to decide the sidebar location. Click the “Sidebar Location” link to define the location. Depending on the number of widget-enabled sections provided by your theme, you will have several options like –
- Display the custom sidebar as the blog sidebar on selected categories,
- Display the custom sidebar as the blog sidebar on selected post types,
- Display the custom sidebar in the footer section(s) for selected categories,
- Display the custom sidebar in the footer section(s) for selected post types and
- Display the custom sidebar on any other widgetized section of your theme.

It is also possible to display the custom sidebar on the archive pages. To do that, click the “For Archives” section below. You have several options like –
- Display the custom sidebar as the blog sidebar, footer sidebar(s) for different archive types
- Display the custom sidebar as the blog sidebar, footer sidebar(s) for different category archive types
- Display the custom sidebar as the blog sidebar, footer sidebar(s) for different authors
Once you have defined the display options for the sidebar, click “Save Changes.” Reload your website to check out the new sidebar(s) in place.
On some instances, you may have a sidebar that contains important information you don’t want to be replaced by the plugin. In that case, get back to the Appearance > Widgets page, and uncheck the “Allow this sidebar to be replaced” box for that sidebar.
Displaying the Sidebar on Single Posts and Pages
The previous section was about displaying the custom sidebars on different categories, post types, archives, and so on. But how do you display a particular sidebar on a specific post or page?
Luckily, the Custom Sidebars plugin comes with a ready-made solution to this problem. Go to the post editor and you will find a brand new section titled “Sidebars” on the right-hand column.

The Sidebars section enables you to choose unique sidebar for all the widgetized sections for that specific post or page. Choose your desired sidebar(s), publish the post, and enjoy the custom sidebars on your content.
Import/Export Settings
If you plan to use Custom Sidebars on multiple WordPress sites, you can easily export and import the plugin settings. To do that, go to Appearance > Widgets, and click the ‘Import / Export Sidebars” link in the Sidebars section.
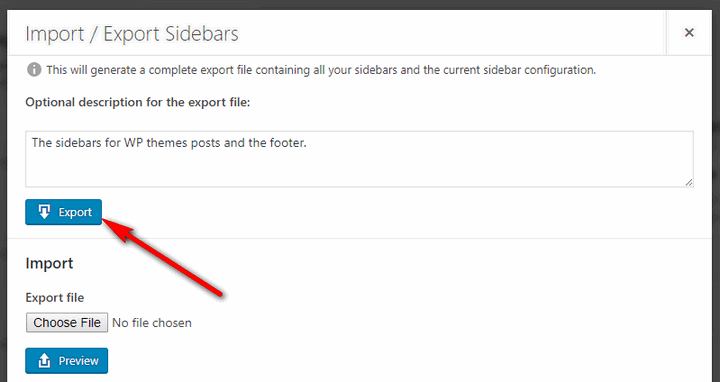
Provide a description about the sidebars you are going to export. Then, click the “Export” button. This will save a JSON file on your computer.
To import the settings file on another website, install and activate the plugin on that site. Go to the Appearance > Widgets page, click the ‘Import / Export Sidebars” link in the Sidebars section. Click the “Choose File” button, select the file, and click “Preview.”
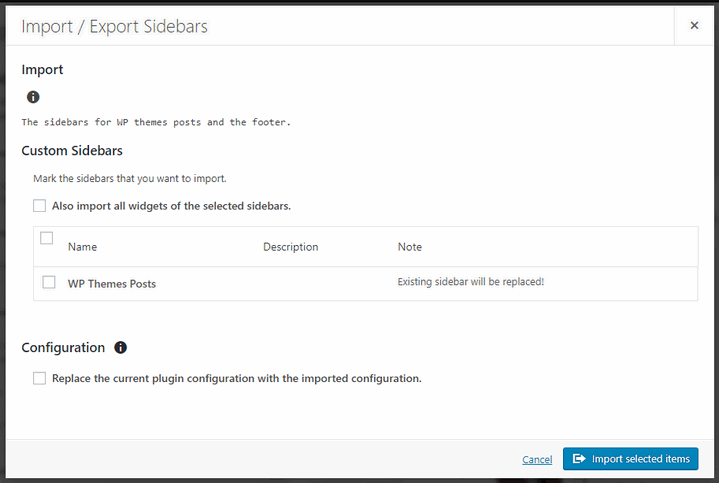
This will show a list of sidebars included in the file. You can choose to include specific sidebars or all sidebars from that file. It is also possible to bring the plugin configurations to the new site. Once you have chosen the necessary items, click “Import selected items.” This will bring the sidebars to your new site. You can access these sidebars from the Appearance > Widgets page.
Final Words
Displaying unique sidebars on your posts and pages can be a great way to enhance the user experience, maximize your income, and to make the most out of your popular posts. This detailed tutorial provided you with the exact steps to do that.
So, what do you think about the Custom Sidebars plugin and its features? Let me know by leaving a comment below.